Monday, May 20, 2019

Recipes for “Busy Day Cake” (Revisited!)

Busy Day Cake” is our (almost weekly) go-to recipe. We’ve enjoyed experimenting and coming up with these “spiced up” options:

You can see the original recipe on this earlier post: Busy Day Cake

Cinnamon Coffee Cake:
Before baking, sprinkle the batter with a mixture of ½ cup sugar mixed with 1 tsp cinnamon. Or add 1 Tbsp butter to the cinnamon/sugar mixture (working it in with a fork) and pour only half of the batter into the baking pan, sprinkle with half of the cinnamon/sugar mixture, then spoon remaining batter on top, and sprinkle with the remaining cinnamon/sugar mixture. Then bake as directed in original recipe.

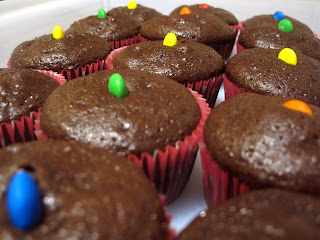
Dark Chocolate Cupcakes:
For dark chocolate cupcakes (or cake), add ¼ cup baking cocoa and substitute ½ cup of strong, black coffee plus ¼ cup milk (for ¾ cup milk in the original recipe). Then bake as directed in original recipe.

These were an early b-day gift for DJ’s teacher!

Saturday, November 24, 2018

Recipe for “Busy Day Cake”

(adapted from a childhood favorite in Better Homes & Gardens)
Great for cupcakes, too!

This recipe makes one 9x9-inch pan (or 12 cupcakes); I usually double the recipe and bake it in a 13x9-inch pan (or as 24 cupcakes).


Ingredients:

1 ½ cups all-purpose flour *
½ cup sugar
2 ½ tsp baking powder
½ tsp salt
¾ cup milk
 cup oil
1 egg
½ tsp vanilla extract

Directions:

Preheat oven to 375 degrees F (190 degrees C). Grease and lightly flour a 9x9-inch baking pan (or line muffin pans with paper liners).

In a medium mixing bowl, combine flour, sugar, baking powder, and salt. In a separate bowl, combine milk, oil, egg, and vanilla; beat with electric mixer until combined. Add dry ingredients and beat until combined, then beat an additional two minutes on medium speed. Turn batter into prepared baking pan (or spoon batter into muffin cups).

Bake cake for 25 to 30 minutes in the preheated oven. (For cupcakes, bake 15 to 20 minutes.) Cake is done when it springs back to the touch (or when a toothpick inserted comes out clean).

Spice it up by adding (blueberry) jam (as pictured above)! Pour only half of the batter into the baking pan, spoon jam onto it, then spoon remaining batter on top, and sprinkle sugar on top of it all. Then bake as directed.

Enjoy!

*Make your own cake flour by replacing 2 Tbsp of cornstarch in 1 cup of all-purpose flour!

Sunday, October 29, 2017

Recipe for Simple Butter Frosting

This recipe makes enough to (generously!) frost top and sides of one two-layer 8-inch round cake.


Ingredients:

6 Tbsp butter
4 cups powdered sugar
¼ cup (whipping) cream (+ 1 to 2 Tbsp, if necessary)
(food coloring)

Directions:

In a mixing bowl beat butter until light and fluffy. Gradually add about half of the powdered sugar, beating well. Beat in ¼ cup cream (and food coloring). Gradually beat in remaining powdered sugar. (Add 1 to 2 Tbsp cream, if necessary, to make frosting of spreading consistency).

Keep the frosted cake refrigerated, if necessary, until ready to serve.

Monday, December 19, 2016

Recipe for Quick Cupcake Frosting

This recipe makes enough to (generously!) frost two dozen cupcakes.


Ingredients:

½ cup (100 grams) butter
3 cups powdered sugar
½ tsp vanilla
2 to 3 Tbsp milk

Directions:

Cut butter into pre-measured powdered sugar. Add vanilla. Beat on medium speed until mixture is crumbly. Add milk – one tablespoonful at a time – beating constantly until reaching spreading consistency. Spread onto (cooled) cupcakes.

Wednesday, August 12, 2015

Recipe for Cocoa Oatmeal No-Bake Cookies

This recipe has been updated from the “bonbon” version (the one that calls for chocolate chips); this one substitutes cocoa (with modifications to the amounts of butter and sugar) instead. So these are even more like the ones Mommy used to make!

So much yummy-ness!

Ingredients:

1 ½ cup sugar
¾ cup butter (150 grams)
¼ cup milk
1 tsp vanilla extract
½ cup cocoa
2½ to 2¾ cups quick cooking oats (200 grams)

Directions:

In a saucepan over medium heat, mix together sugar, butter, and milk. Bring to a rolling boil, and boil for one minute, stirring constantly.

Remove from heat and stir in vanilla and then cocoa, and mix until well blended; add oatmeal.

(If the mix starts to get crumbly, stir in a teaspoon or two of hot water; the cookies should then set up fine.)

Drop by spoonfuls onto cookie sheets. (I prefer to use dinner plates and refrigerate the cookies so they get firm faster!)


Enjoy!

Sunday, April 5, 2015

Recipe for Pink Guava Jam

This is an easy recipe for pink guava jam!

Ingredients:

3 cups pink guavas, seeded and chopped
2 medium limes, juiced (about 4 Tbsp)
1 Tbsp apple cider vinegar
1 ½ cups sugar
(1 tsp salt)

This recipe is a combination of two other recipes: Basically, I started using one and then, when doing a last minute search, ended up finding one specifically for pink guavas – the kind that the tree in our back yard produced in abundance this year! We were pretty happy with the results of the combined recipe, so I’m posting it here.

Pink guavas, as we can testify from experience, are ripe when they either fall off the tree on their own or when they come off the tree when barely touched. When ripe, they will be pink on the inside and quite soft. The inside pinks range from light pink to bright pink.


Directions:

After washing the guavas, cut them in half and spoon out the middle sections containing the seeds. (The seeds are quite hard and unpleasant when accidentally bitten!) Chop the half guavas into “cubes” and measure the required quantity. (I tripled this recipe on our first try.)


Put the cut-up guava “meat” into the blender, add lime juice and cider vinegar, and pulse until relatively but not completely smooth. Pour into saucepan, add the sugar (and salt, if desired) and stir until well-mixed. (I had an eager 4-year-old assistant for this part!)


Bring the mixture to a boil, then reduce heat to medium-low and simmer for 30 minutes, stirring occasionally. The jam will be become a more intense pink at this point – and the whole house will smell wonderful!

After simmering for 30 minutes, remove from heat and let cool. Pour into jars and refrigerate until use. The jam will thicken as it cools.


OR: Pour into sterilized jars and process in boiling water for ten minutes (with at least one inch of water over top of jars). Remove from canner pot and place on a towel, allowing jars to cool. Listen for lids to pop, signifying airtight seal.

Note:
Last year the guava tree in the back yard gave us about 15 guavas. One year later, we’re “guesstimating” that we’ve harvested about 100! Very exciting! If I’d realized the harvest was going to increase almost ten-fold, I would’ve followed the advice given in one of the recipes I consulted: “Freeze if you cannot make jam on the same day – a good option as guavas mature at greatly varying times.”

Making jam brought back memories of three of my favorite people: my Mommy and my Grampa & Gramma in-love!


I “canned” the guava jam in a less-than-professional way, recycling jam jars I had on hand, hoping the seals would reseal – just like Grampa did during our last visit with him. I figured that whether they truly “sealed” or not, I could keep ‘em in the fridge – just in case… But they sealed – just like Grampa’s! Sweet memories…
Monday, September 8, 2014

Reposting from “Happy, Strong Home” Blog: Wholesome Recipes & Money-Saving Tips

Reposting from my friend Julie at Happy, Strong Home:

How to Feed a Family (of 4) for $125/Week at Whole Foods

Julie says:
“When we switched to organic and natural foods about six or seven years ago, the sticker shock was brutal! We transitioned item by item every few months to adjust our menu without adjusting our budget too much.
 
I often hear how expensive it is to eat organic (not gonna lie, depending on what you buy, you can blow your budget on products with the “organic” label!).
 
But I’m here to show you how to create a menu to feed a family (of four!) on just $125 per week.”

Feed a Family on $125

We don’t have a Whole Foods Market in my neighborhood in Uruguay, but I’m planning to check out some of the recipes Julie shares in this post...


Thanks, Julie! J

Wednesday, April 10, 2013

Favorite Recipe: Corn Casserole

Also called corn pudding, corn spoonbread, or even corn cake, this recipe has been a favorite, often showing up at extended family potlucks!


Mix together dry ingredients* and set aside:

1 cup bread flour (or all-purpose flour)
1 cup yellow cornmeal
4 Tbsp sugar
1 Tbsp baking powder
½ tsp salt

In another mixing bowl, mix together:

1 can (15 to 16-oz) whole-kernel corn (undrained)
1 can (15 to 16-oz) creamed corn
3 eggs
½ cup corn oil
½ cup (melted) butter
1 cup plain yogurt (or sour cream)*

Combine dry and wet ingredients. Mix well. Pour into ungreased 1.5-liter (1.5-quart) glass bread pan (or casserole dish) and bake at 350 degrees F for at least one hour – until firm and top is golden brown. (May take longer than one hour.)
 
Awesome as left-overs, too!

Enjoy! (We surely do!)
 
 
*Frugal Notes:
  • The original recipe calls for Jiffy Corn Muffin Mix. My dry-ingredients substitution has worked marvelously – and will undoubtedly continue to serve us well in other areas of the world where Jiffy Mix doesn’t even exist!
  • I regularly substitute plain yogurt for sour cream – with great success!

Friday, March 29, 2013

Educational Freebies from Little Learning Lovies

Little Learning Lovies is offering some great educational freebies right now.

Two of my favorites are:

FREE -- PreWriting Set 1 -- PreK --- SAMPLE
pre-writing fun for my eager "K-2" student

FREE SAMPLER - Addition Clip Cards -- Farm Theme
fun addition practice for my rising 2nd grader

Download these and more -- totally free -- at Little Learning Lovies! (On the home page, go to "Free" in the left column.)
 
Don’t forget to enter the $50 giveaway, ending tonight, March 29, at midnight! Click here for complete details.

Thursday, March 28, 2013

Little Learning Lovies: April Packs over 70% off!

Beginning in April, Little Learning Lovies will be introducing a new set of monthly packs, each centered on a particular theme. All products contained in each “Lovie Pack” will be brand new, never-before-released games and activities. You’ll be able to purchase each pack for only $14 – but their retail value will always be $20 or more and contain at least eight different games and activities!
 
Here’s the exciting news for all us Bargain Hunters: To start off this project with a bang, Little Learning Lovies is offering the option for you to pre-purchase the April Pack(s) for over 60% off!
 
 
I’m personally very excited about April’s “Farm Time” theme in both the “PreK to Grade 1” and “Grades 1 to 3” Packs. Click on the farm picture above to get a sneak-peek of some of the games and activities included in the April Pack.
 
Now through March 31, you can pre-purchase the packs for only $8.50 each. Or do as I did and buy both the Little Lovies and Tiny Lovies Packs for only $12 – i.e. only $6.00 each!
 
Plus, I’m especially excited to offer coupon code b1g1 (all lowercase) to the readers of this blog, so you all can get an extra 10% discount! But don’t wait – these offers are valid only through March 31.
 
Happy shopping – and learning!
 
And don’t forget to enter the $50 giveaway, ending on March 29. Click here for complete details!